| Your Complete Guide to Salesforce Lightning Email Templates | 您所在的位置:网站首页 › show custom links in lightning home page › Your Complete Guide to Salesforce Lightning Email Templates |
Your Complete Guide to Salesforce Lightning Email Templates
|
Posted on July 21, 2021
in
Admins
Your Complete Guide to Salesforce Lightning Email Templates
Share this article...
Do you like receiving plain text emails from businesses, or does this look a bit shabby? Salesforce comes to the rescue with Lightning Email Templates. Using the Lightning email builder, built on the Salesforce platform, you are able to insert fields into email templates (mail merge) from a record in Salesforce to use across a range of use cases (e.g. for sales emails, renewals, and case updates). You and your users can use the Lightning Email Template Builder directly (providing they use Lightning). It works with merge fields in email alerts, Flow, Approval Processes and more. It’s better and much more modern than Salesforce Classic Email Templates, and is also the same builder that’s been rolled out across many other Salesforce platform products, such as Pardot. In this article, we’ll look at how to set up Lightning Email Templates (note: they are not enabled by default!). Then we will dive into its key features, what it looks like in practice, and its limitations. Great news: It’s easy to update existing Email Alerts to use a new Lightning email template – you just need to edit the Email Alert and point it to the new Lightning email template. 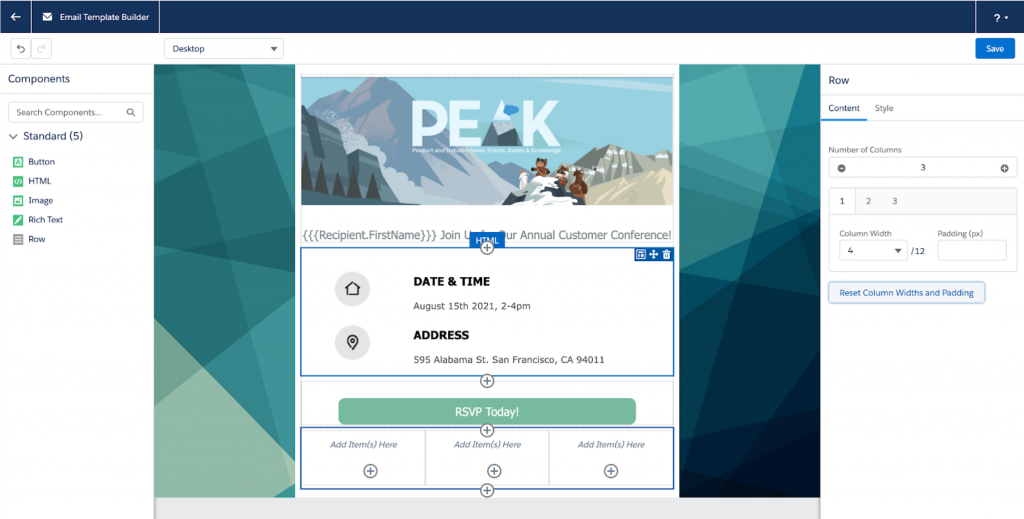 How to Enable Lightning Email Templates
This is a two-part process (perhaps try it in a sandbox first!). Part 1: Enabled Template Folder SharingThis part is not mandatory, just very helpful to all your users, so they can share and access email templates amongst themselves. Go to Setup and search for Lightning Email Templates.Switch on Folders and Enhanced Sharing (see screenshot below).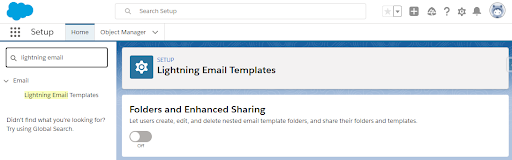 Part 2: Enable Content Builder
Create a new Permission Set (e.g. “Lightning Email permission set”).Go to System Permissions.
Part 2: Enable Content Builder
Create a new Permission Set (e.g. “Lightning Email permission set”).Go to System Permissions.
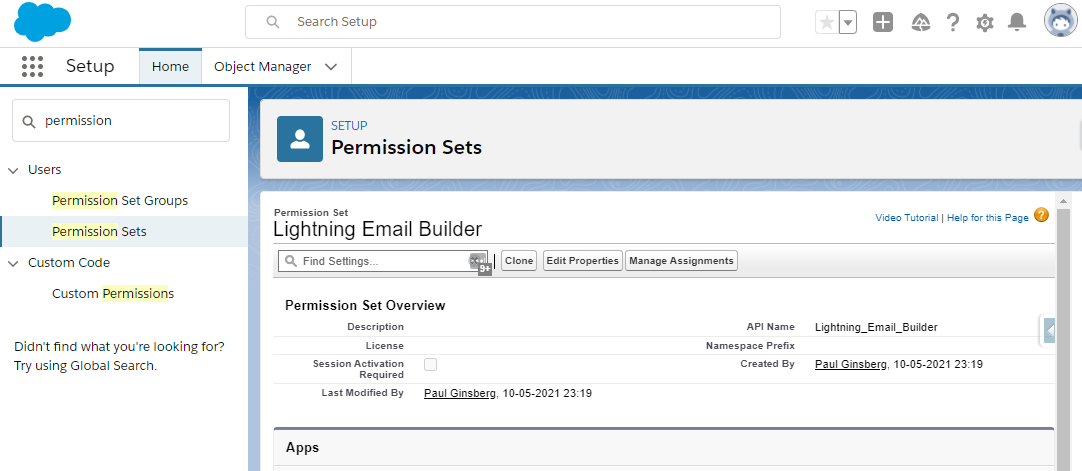

3. Tick Access drag-and-drop content builder (this controls whether the “Edit in Builder” button appears later on). 4. Save. 5. Apply to users as appropriate. 
6. Wait 15 minutes*. If you don’t see “Edit in Builder” when using the Template Builder in the next section, then your system still hasn’t been updated. *or log out and back in again – this is to avoid the Lightning delay! Create Email Templates in Salesforce Lightning Click on App Launcher (the nine dots, in the top left-hand corner) and search for Templates in the App menu. Apparently, it’s been there for a while, but this is the first time that I’ve noticed it!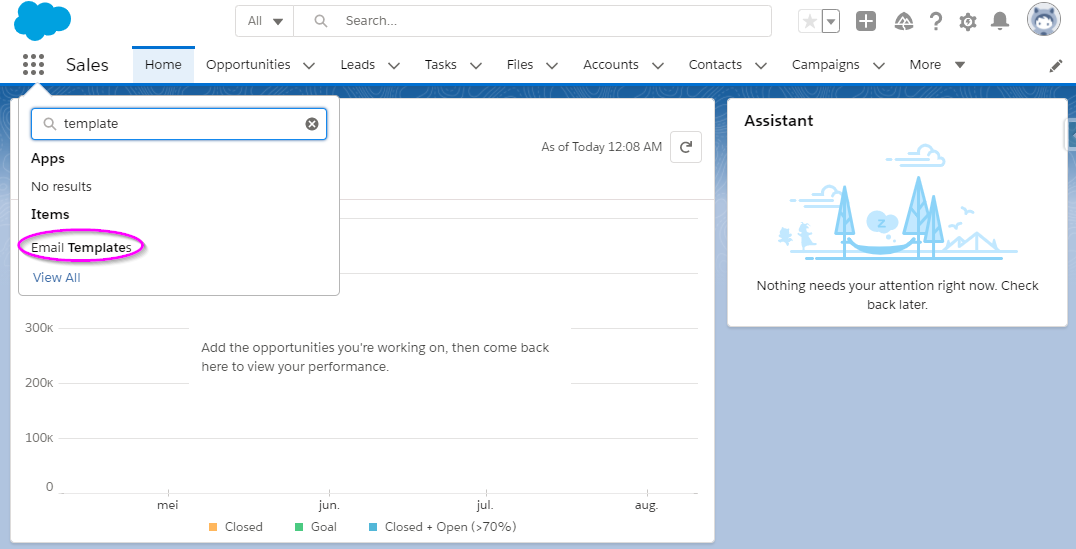
2. Create a new template. Here you put in the “metadata” for the email, such as the subject line, which object it relates to (if you want to merge field data into it), and where it should be saved. The body of the email comes soon, but not quite yet! 
3. The next screen will have an Edit in Builder button. Click it! 
4. Once in the email screen itself (which we’ll fully explore in the next section), you will probably want to update the background color as your first action item. If grey is your thing, then leave it alone, but for everything else, go to Style (on the right), click the color selection box, and change it to #FFFFFF or 255, 255, 255 to reset the background to white. Add images to email templates in Salesforce Lightning easily by dragging an image component from the left-hand sidebar on to the email canvas. 
5. Welcome to the Lightning Email Builder! Lightning Email Builder: Key Features
You’ll recognize the layout of the Content Builder. On the left-hand side are the drag and drop components. The exciting part is that there’s clearly scope for new elements to be added over time. On the right-hand side, the properties/details of each component can be adjusted, such as merge fields for rich text, image location (which you can directly upload), or color, margin, and image width in the “Style” subsection. Press Save, and then you’re ready to use the email template! How Does it Work?As discussed, you can use these in an Email Alert, or end users can use them directly within Salesforce when creating an email. At the bottom of the email screen, there’s the insert, create, or update template button, which users can click to select the template that they want. 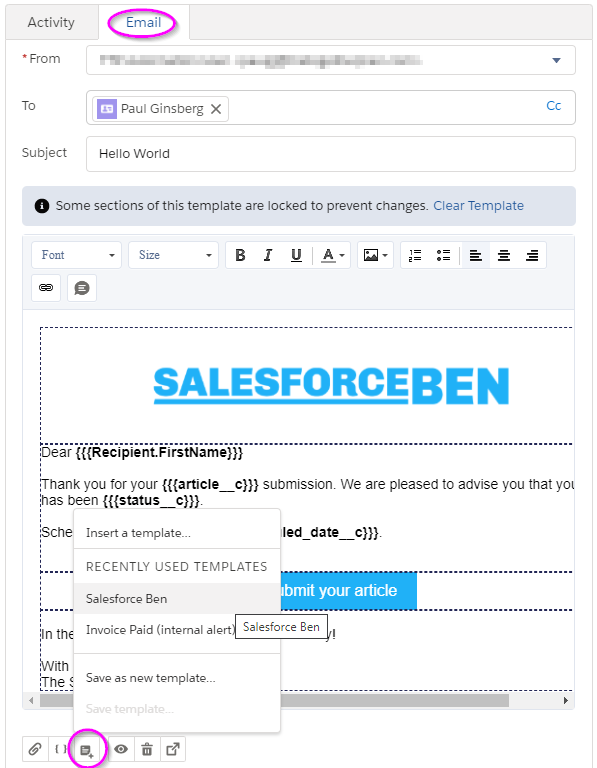
And, with that previously mentioned – but avoidable – default grey background creeping in at the sides, here’s the final result when received and viewed on mobile:  Lightning Email Template Limitations
Merge fields are resolved for most activity-enabled objects – the exception is that merge fields are not yet available for Contact and Lead objects (this is on Salesforce’s roadmap).You cannot edit classic email templates in the Content Builder; you have to create new Lightning email templates. However, updating an Email Alert is simply a matter of editing the Email Alert, pointing and clicking. and selecting the new Lightning email template.Cross-object merge fields still aren’t supported (though there’s a long-standing, popular idea that Salesforce are very much aware of).Lightning Email Template Content Builder is not as powerful as Marketing Cloud’s Email Studio.Some Classic Template functionality is missing, such as:Send Test and Verify Merge Fields.Record Type Name. This field needs to be recreated as a Formula Field; using the RecordType field gives the Record Type ID instead.Details Link (the ability to insert a link directly to the record, which is very useful for internal email alerts). The merge field you need to type is “.link” e.g. {{{Contact.link}}} or {{{CustomObject__c.link}}}
Further Reading
Lightning Email Template Limitations
Merge fields are resolved for most activity-enabled objects – the exception is that merge fields are not yet available for Contact and Lead objects (this is on Salesforce’s roadmap).You cannot edit classic email templates in the Content Builder; you have to create new Lightning email templates. However, updating an Email Alert is simply a matter of editing the Email Alert, pointing and clicking. and selecting the new Lightning email template.Cross-object merge fields still aren’t supported (though there’s a long-standing, popular idea that Salesforce are very much aware of).Lightning Email Template Content Builder is not as powerful as Marketing Cloud’s Email Studio.Some Classic Template functionality is missing, such as:Send Test and Verify Merge Fields.Record Type Name. This field needs to be recreated as a Formula Field; using the RecordType field gives the Record Type ID instead.Details Link (the ability to insert a link directly to the record, which is very useful for internal email alerts). The merge field you need to type is “.link” e.g. {{{Contact.link}}} or {{{CustomObject__c.link}}}
Further Reading
If you’re keen to continue learning about Salesforce Lightning Email Templates, check out the resources below: Sending emails from Salesforce? Here’s what you need to know!Email Alert ActionsFinally, huge thanks go to Johann Furmann and Justyna Krajewska for their input on this article. |
【本文地址】